Ramen Noodles From Scratch (the No-Knead Easy Way)

This post may contain affiliate links where, at no additional cost to you, I receive a small commission when products are purchased through those links. As an Amazon Associate, I earn from qualifying purchases. Any commisions earned helps keep this site sustainable. Click here for privacy policy.
Ramen noodles are easy to make but the dough is tough to knead and roll by hand. To make ramen the easy way, use a pasta machine and let it do all the hard work, essentially making this a no-knead Ramen noodles from scratch method.

I love the feeling of euphoria and pride when I successfully make something from scratch. Kneading soft, malleable dough with my hands for a few minutes? That I can handle. I find the rhythmic motions relaxing. What I don’t love, is when a recipe is too much of a chore. Pounding an ultra-stiff dough with my fist for even 1 minute while not even making a dent? Too much work.
That’s when it’s time to use a pasta machine to help retain my love of noodle-making, my children’s love of noodle-making, and our sanity.

But this ramen dough was just way too tough to knead by hand let alone roll out by hand. So we used an alternate kneading technique that worked for us in the Chinese egg noodle recipe. We took a large rolling pin and hit the dough hard, turned the dough over, repeat. That helped a little.
What helped a lot was using our pasta machine. We have two of these Italian-made pasta machines from Marcato to make things easier for us. One in our Dubai home and one in my parents’ home for when we visit. I was unsure of it at first but now I can’t imagine making noodles without it (bonus: it comes in 9 different colors so you can color-coordinate your kitchen.)
You just feed the dough into the machine and crank the handle to flatten the dough until the desired thinness. And then you cut the flattened dough into thin strands. The machine does all the hard work and this becomes a no-knead Ramen noodles from scratch recipe.
Wondering which pasta machine is best to buy? Click here to read my review of two popular Italian-made brands: the Marcato Atlas versus the Cucina Pro Imperia.
What are Ramen Noodles?
Ramen is a type of Japanese noodle made from wheat flour. In Japan, ramen is eaten freshly made, not like the inexpensive packets of instant noodles (you know, the ones that are 10¢ a packet?) which are deep-fried and full of MSG.
Ramen originated from China: the term “ramen” may have been derived from the Chinese words for pulled noodles (“la mian”) because Chinese noodles were traditionally pulled by hand. Another theory is that “ramen was derived from Chinese “lo mien” which is boiled noodles tossed with sauce.
Can Ramen Noodles Be Made Successfully at Home?
Yes!
You most likely have all the ingredients in your pantry to make homemade ramen noodles from scratch. This is an eggless Japanese ramen noodle recipe and needs only 3 ingredients.
To make fresh ramen at home, all you need is:
- All-purpose flour
- Water
- Alkaline agent: either lye water (aka “kansui” and can be purchased from an Asian grocery store) or baking soda.
To use baking soda to make ramen noodles, you must first bake it in the oven for one hour. Click here for my instructions on how to make *baked* baking soda and why alkaline agents are essential to making ramen noodles.
After you’ve mastered making ramen noodles from scratch, you can serve it with my Tonkotsu ramen with braised pork belly.
How to Make Homemade Ramen Noodles From Scratch
Continue reading below for detailed instructions (with step-by-step photos) on how to make ramen noodles from scratch or you can click here to jump to the print-friendly recipe.
Enjoy and have fun with this!
The basic steps are as follows:
- Add lye water or baked baking soda to warm water to make an alkaline solution.
- Add alkaline solution to the flour; mix and squish dough into a ball.
- Rest dough 30 minutes.
- “Knead” 2-3 minutes with rolling pin.
- Roll dough flat with pasta machine.
- Cut dough into long strips of noodles.
- Simmer noodles briefly in boiling water.
You will need the following (serves 4):
- 240 grams all-purpose flour (2 cups)
- 2 teaspoons baked baking soda (or 1 teaspoon of lye water aka “kansui”)
- 1/2 cup plus 1 teaspoon warm water (you might need more but this is a good start)
- Pasta machine
- Large mixing bowl
- Spoon or spatula or chopsticks
- Measuring cup or kitchen scale. I prefer a kitchen scale (I have this OXO one) because it makes for more consistent measuring as a cup of flour can range anywhere from 100 grams to 300 grams depending on how lightly or tightly packed the flour is.)
Step 1 — Make an alkaline water solution.
Add baked baking soda (or use “kansui” if you have that) to the warm water and mix well to make an alkaline solution.
Step 2 — Mix flour and alkaline solution in a large mixing bowl.
Place flour in a large bowl and pour in the alkaline solution.
The flour will immediately turn a yellowish color as the natural yellow pigments in flavonoid compounds that are otherwise colorless at neutral pH are liberated at a higher basic pH of 9-11, giving the noodles a characteristic golden hue (source: Lucky Peach).

Use a spoon, spatula or chopsticks to mix in the water. The flour will become a crumbly texture and that is what you want for now.

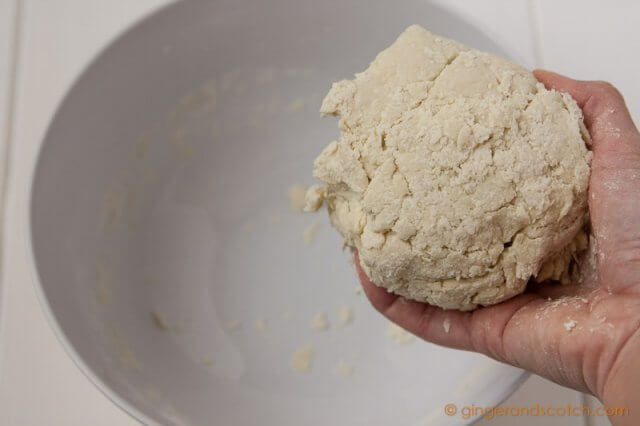
Use your hands to squish the flour crumbs together into a ball.

If the flour doesn’t completely form a ball after a bit of squeezing, then add more water, but only a tablespoon at a time, until you get one cohesive ball.

This is what you are aiming for – a dry and crumbly looking dough with barely any crumbs left in the mixing bowl:
Step 3 — Rest dough for 30 minutes at room temperature.
Wrap the dough in plastic wrap or place it in a bowl covered with a damp towel so the dough does not dry out.
Allow the dough to rest for 30 minutes at room temperaure (just enough time for the kids and I to watch one episode of our favorite Netflix show – currently Voltron because it is the coolest reboot EVER!).
You can also rest the dough in the fridge overnight if you don’t plan on rolling the dough out right away.

Step 4 — “Knead” the dough for 2 to 3 minutes.
This is not a soft, smooth and easy dough to knead like the basic Chinese noodle dough or the Chinese egg noodle dough we previously made. The kids and I really struggled kneading by hand so I let them use a large rolling pin to beat the dough like they did in the Chinese egg noodle recipe.
They took turns beating the dough for about 3 minutes. To “knead” with a rolling pin, give the dough a couple of whacks, pat into a ball, whack it again and repeat. I find that putting on their favorite music helps the time pass quickly. We’re currently rocking to “Shake it Off” from the silly kids movie Sing.

Step 5 — Roll the dough flat with a pasta machine.
Set your pasta machine to the widest setting (Level 0 for Marcato brand and Level 6 for Imperia brand). Divide your dough in half and return the unused portion to it’s plastic wrap or towel covered bowl.
Flatten the other half of your dough as much as possible by hand (or whack with the rolling pin again) and start feeding it through the pasta machine.
Don’t be discouraged by the first pass of the dough through the pasta machine. It will look pretty raggedy and holey and uneven but will become smooth and even after a few more passes.

Fold the raggedy dough into thirds and pass it through the machine again. Repeat 3 or 4 more times.


After a few passes through the machine, it will look and feel smooth and become more and more rectangular. The machine is essentially kneading the dough for you.

Only fold the dough into thirds when you are passing it through the widest setting of the machine.
Keep folding in thirds and passing it through the widest setting until you get one long rectangular piece that’s not broken into pieces (it took us 6-8 passes).

Once the dough is flattened to a nice looking (not holey or broken into bits) rectangular shape, pass the dough through the machine two more times but in one piece without folding it into thirds. You are still using the widest setting of the machine.
Step 6 — Continue rolling the dough through the pasta maker until desired thinness.
Now adjust the machine setting to the next size setting and pass the dough through 2 times but remember: DO NOT FOLD in thirds anymore. Pass the dough through as a single sheet. Dust with a little bit of tapioca or corn starch before each pass to prevent any possible stick-age.

With the Marcato pasta machine, we started with the widest setting of 0, then went to level 1, then level 2, then level 3 and stopped at level 4 which according to the user manual is 1.9mm (1/16 inch). We did try level 5 but the noodles came out too thin for our liking.
At this point, the dough will not be completely smooth like the our homemade udon dough but once it passes through the cutters, it will be still become beautiful noodles!
Step 7 — Cut dough into long strips of noodles with the pasta machine.
Finally we are ready to cut the dough into strands! Our Marcato pasta machine came with two size options – a thick fettucine size or a thin spaghettini size. We used the spaghettini cutter to make these ramen noodles.
Our flattened dough was a bit long so the children cut it in half using a dough scraper/cutter or you can also use a knife.
Lightly dust the dough with tapioca or corn starch and then pass it through the cutters:

This is our favorite part – watching that piece of dough slowly emerge out of the machine as many individual strands of noodles! It’s a WOW moment for us every time.
Repeat the process with the other half of the dough.

Step 8 — Simmer noodles in boiling water.
To cook these noodles, bring a large pot of water to boil. Then add the noodles and cook for 1 minute. These noodles are thin so don’t need much time to cook at all or they’ll become very gummy/sticky. You want to undercook them slightly as they’ll also soften up slightly in your soup broth. Drain and rinse under cold water.
There you go – fresh homemade ramen noodles from scratch the no-knead easy way!

When you make your first batch of noodles, you will feel as proud and as euphoric as we did. Don’t worry if your first batch isn’t perfect. Remember: Noodles aren’t meant to be perfect, they’re meant to be shared.
After you’ve mastered making ramen noodles from scratch, you can serve it with my Tonkotsu ramen with braised pork belly.
Be sure to tag us on Instagram (@gingerandscotch) and Twitter (@gingerandscotch) and show us your noodle-making in action.
Happy Noodling!
-Sandy

Homemade Ramen Noodles From Scratch
Ingredients
Method
- Make Your alkaline water solution.Add baked baking soda (or use "kansui" if you have that) to the warm water and mix well to make an alkaline solution.
- Mix flour and alkaline solution in a large mixing bowl. Place flour in a large bowl and pour in the alkaline solution. The flour will immediately turn a yellowish. Use a spoon, spatula or chopsticks to mix in the water until it is all incorporated into the flour. Then use your hands to squeeze the flour "crumbs" together into a ball. If the flour doesn’t completely form a ball after a bit of squeezing, then add more water, but only a tablespoon at a time, until you get one cohesive ball.
- Rest dough for 30 minutes at room temperature. Wrap the dough in plastic wrap or place it in a bowl covered with a damp towel so the dough does not dry out.
- “Knead” the dough for 2-3 minutes. Knead by hand or “knead” with a large-diameter rolling pin. To “knead” with a rolling pin, give the dough a couple of whacks, pat into a ball, whack it again and repeat.
- Roll dough flat with the pasta machine at the widest setting. Set your pasta machine to the widest setting (level 0 for Marcato brand and Level 6 for Imperia brand). Divide your dough in half and return the unused portion to it’s plastic wrap or towel covered bowl. Flatten the other half of your dough as much as possible by hand (or whack with the rolling pin again) and start feeding it through the pasta machine.It will look raggedy and rough. Fold the raggedy dough into thirds and pass it through the machine again. Repeat 5 or 6 more times. Once the dough is flattened to a nice looking (not holey or broken into bits) rectangular shape, pass the dough through the machine two more times but in one piece without folding it into thirds.
- Continue rolling the dough through the pasta machine until desired thickness.Adjust the pasta machine to the next smaller size setting and pass the dough through the rollers 2 more times but remember DO NOT FOLD in thirds anymore. Pass it through as a single sheet.Dust dough with a little tapioca starch or corn starch to prevent any possible stick-age.With our Marcato pasta machine, we started with the widest setting of 0, then went to level 1, then level 2 and stopped at level 4 which according ot the user manual is 1.9mm (1/16 inch) thickness. We did try level 5 but the noodles came out too thin for our liking.At this point, the dough may not be completely smooth like our homemade udon dough but once it passes through the cutters, it will still become beautiful noodles!
- Cut dough into long strips of noodles with the pasta machine.Our Marcato pasta machine came with only two size options – a thick fettucine size or a thin spaghettini size. We used the spaghettini cutter to make these ramen noodles.If your flattened dough is too long, cut it in half. Lightly dust the dough with tapioca or corn starch and then pass it through the cutters.
- Simmer noodles in boiling water. To cook these noodles, bring a large pot of water to boil. Then add the noodles and cook for 1 minute. These noodles are thin so don’t need much time to cook at all or they’ll become very gummy/sticky. ou want to undercook them slightly as they’ll also soften up slightly in your soup broth. Drain and rinse under cold water.
Notes
• Marcato pasta machine
• Imperia pasta machine
• OXO digital scale
• OXO dough cutter and scraper
Subscribe to my monthly newsletter and receive a FREE noodle guide PDF:

*We respect your privacy and will not send you spam. You may unsubscribe at any time.
am i able to make these and not cook them right away ? like refrigerate them for the next day ?
I always cook them right away and then store in the fridge. Although we don’t usually have any leftovers to store in the fridge. But you can always give it a try and store it the the fridge, then cook it the next day and see if it works for you.
The BEST!!!! I even switched the flour to Kumut (Gluten sensitive) it was so simple and absolutely perfect!!!! So worth the little extra time to enjoy fresh noodles!!!!!
Can I substitute wheat flour for all purpose?
All purpose flour is made from finely ground wheat
New to your website.
I have a question: how can I turn this into instant ramen version (longer storage, and just add water later). Love to homemade healthy noodle, but want some convenience when can’t freshly make them.
Hello!
I was wondering if I could cut the dough by hand since I don’t have a pasta machine.
Hi
Is there a way to make instant ramen using homemade ramen noodles?
Such an easy recipe! I added ~1/2 tsp of salt to the dough, otherwise followed exactly and it turned out great. I love the chewyness of the ramen. Thank you!
I have a Emeril Lagasse pasta maker could I use that when making this recipe?
Thank you for the recipes. I have a question. I can taste a bitterness on the noodle. Should i reduce the baked baking soda? Or do you think it’s something else?
It seems to kneed the dough you could use the same as for udon noodle. Plastic bag inside a bigger bag. With sick on walk onthe noodles. Do this 4 times each time take out of the bags and fold them back into bags. I saw this o.n TV it works for udon
I’ve been watching all kinds of youtube videos and some say not to go over 1% of the flour when it comes to the baked baking soda. And this recipe doesnt call for salt at all? but From what I recall this recipe is 4% baked baking soda which seems like a LOT more but might be neccessary because whenever I use 1% the dough is TOUGH to roll.
I have been craving ramen from my home town, it didn’t matter what brand of noodles I tried none of them were good enough. Finally I tried this recipe, and these are the best damn ramen noodles I have ever had ! Chewy and tasty, perfect consistency! I can’t believe how easy they were ! Thank you so much ! I can now have ramen whenever I want !
Hello! This is a great recipe – thanks so much!
I’ve got a question:
How can the ramen be preserved without freezing? Does drying work? I’d like to make some form of instant ramen although from what I’ve heard the actual version is difficult and involves frying the noodles first.
Thanks,
Mark
I have tried air drying the noodles but when rehydrating them in boiling water (like pasta), I found that there was an after-taste that I did not like. But you should try it yourself and see how that method works for you.
Freezing has worked well for us.
If you are making it earlier in the day, can you just refrigerate it?
Hi Sandy;
After I have made the noodles, do I have to cook them immediately? Can the noodles be stored for a couple of days or so?
Can this recipe be doubled or even tripled? (ie: feeding a family of 6 for hot pot)
My son, his family and I LOVE hot pot! We try to have it at least 3 to 4 times a year!!
How can I subscribe to your recipes?
Looking forward to your response.
Hi Angie,
After you cut the noodles, you should cook it right away so that they don’t dry out or stick together too much. You can store the noodles after cooking by rinsing them in cold water so that they stop the cooking process and then drain well. Store in the fridge or even freeze. If cooking frozen noodles, no need to defrost: When you need the noodles, just toss it in boiling water for a minute or so until heated up.
I often double the recipe as we are a family of 4 that likes double noodle portions. Also, I like to make extra for dinner and lunch the next day.
Hi! Love the recepie i Will try it soon! Question: if I don’t want to use all the noodles… can I freeze them? Or what can I do to preserve them for a future use?
If want to write me: Danigonzalezo@gmail.com
You can store the noodles after cooking by rinsing them in cold water so that they stop the cooking process and then drain well. Store in the fridge or even freeze. If cooking frozen noodles, no need to defrost: When you need the noodles, just toss it in boiling water for a minute or so until heated up.
I followed this recipe and froze the noodles, so I haven’t tasted them yet, but I had extreme difficulty with it as it is written above. I am a novice at anything involving flour and followed the cup measurements in the recipe. If you are a novice as well, hopefully this is useful info:
Metric to imperial measurements for flour are a pretty inexact science because it depends a lot on the type of flour and how much you pack it in. The conversion for 240 grams to 2 cups for all purpose flour seems totally off to me. I would recommend just getting a scale and sticking to measuring in grams since that is absolute. Online conversion charts say 240 grams is anywhere between 1 to 1.66 cups.
Why does this matter? Because when I used the measurements as stated, the dough was so dry and a crumbly mess I could barely pass it through the roller on the thickest setting. It would come out in shriveled chunks even after roughly 30 passes through. Having never used a pasta machine I thought there had to be some user error here. After all, in the comments people are saying their 10 year olds are making the recipe. In reality, the cup of flour to water ratio is just totally wrong. Once I added a lot more (warm!) water it worked perfectly. Of course I would have added water sooner but it still looked like the pictures in this blog and I also didn’t really have enough experience to understand what I did wrong, especially when the blog indicates that the dough is supposed to be pretty scraggly coming out of the machine.
So the lesson is, don’t rely on the cup measurement. Use the mass measurement. Now I have to wait for tomorrow when I cook the noodles and hope the ratio of alkaline water did not get off when I added more water to the dough and it still tastes good…
I ALWAYS weigh my flour. In my post, I say that “I prefer a kitchen scale (I have this OXO one) because it makes for more consistent measuring as a cup of flour can range anywhere from 100 grams to 300 grams depending on how lightly or tightly packed the flour is.”
And to be consistent in all my posts, I use 120 grams to equal 1 cup of flour. This is the measurement that the top flour brands like King Arthur and Gold Medal use. I could choose 125 grams or 130 grams, but I choose 120 grams and as a result, I base my other measurements like water and lye, etc on this quantity. I also ALWAYS WEIGH my water for the same reason that 1 cup water could weigh slightly different. I use imperial for those who don’t have a kitchen scale or who refuse to use one.
Having worked with dough, then you already know that you also have to be careful how much water to add. Which is why I explain as best as I can that you add almost all the water recommended and then if that’s not enough, you add more in small increments like maybe 1 teaspoon at a time. This was all explained in my post. And then, here’s the important part: after you have figured out what works for you, then you write that down and use the same amount the next time. After all, our flour brands, kitchen altitude, kitchen humidity will all play a factor in working with dough.
Good luck!
Great recipe and fun. I tripled the recipe and substituted 1/2 unbleached cake and pastry flour and 1/2 durum semolina flour to make the noodles and added one more egg. The dough was not as dry as yours but turned out perfect noodles that we used in a snow goose pho. I have made pasta many times and am wondering why you use such a stiff, hard to work dough. Would it not benefit from slightly more hydration?
I prefer a stiffer noodle dough for ramen and egg noodles so that there is a nice bite. I find that a higher hydration dough makes for softer noodles and isn’t as nice when eaten with soup. Sure, I could cook it less but it’s not the same.
This is totally a personal preference. If you prefer a slightly higher hydration, then go for it. After all, you’re the one eating the noodles, right?
Thank you so much for this recipe, my family goes through ramen like nobody’s business. Now, I can make these noodles for them and all our spur of the moment camping excursions.
This is great! i landed here because i also bought Bowl and wanted to try the ramen recipe. Very excited about the baking soda tip!
Just made these noodles this morning after staring at this recipe for a week straight! We finally got some jian shui yesterday and I hopped on this right away. I’m back home temporarily (COVID) with my parents and sister, and they LOVED this. My family is big on noodles and ramen (we’re Chinese) and this will definitely be a new family stable! Thanks for sharing(:
Hi Sandy,
I was wondering how many times you have made this recipe and if it damages the pasta machine in any way? I’ve been told that because it’s such a tough dough the pasta machine wouldn’t survive after the 5th time of making it. Thanks!
Hi Karen,
We make noodles about once a week but not always ramen. We haven’t had any issues so far (knock on wood). Just be careful when forcing the dough down during level 0. When I feel that it’s too difficult to turn the handle, then I use my hands to squish it smaller until it is easier to turn. Hope that helps.
It’s so delicious. My son realy like it. We had a happy diner together. Thanks you!
Thanks for your easy to follow recipe! I was afraid to try making ramen for years until I came across your blog.
Thanks!!
I am so happy to hear this! I hope it turned out well and that you will make it again. What did you serve it with? I am currently working on a Tonkotsu post and will share soon.
Sandy,
Your recipe is great. Easy to do. I made it with my son. Very happy and the results achieved beyond imagination. yummy. Thanks you!
Very intriguing. I will try this. I have a question though, is this freezer friendly?
Yes, freezer friendly. I do it all the time. But you have to cook the noodles first, drain, let them cool, then freeze them in ziplock bags. When you are ready to use the noodles, put the frozen noodles directly in boiling water and simmer for 1 minute and they are ready for adding to soup or stir-fry.