
Ingredients
Method
- Dissolve salt in warm water. Do not add the salt directly to the flour! Add the salt to the warm water and stir to dissolve the salt crystals.
- Mix the flour, tapioca starch and the salted water in a large mixing bowl. Add the water and salt mixture to the flour and start mixing with your hands or a utensil. The dough should be on the drier side (so not completely covered with water).
- Squish the dough into a ball and place it into a resealable bag. Start squeezing the flour so that it forms a ball. See how, in the photo below, the dough is quite rough and bumpy with very little bits of dough crumbs at the bottom of the bowl? That’s what you want. Don’t worry, the dough will come together nicely after kneading and becoming very smooth.If flour remains in the bowl that won’t stick to your ball, add water to the bowl, 1 teaspoon at a time, until all the flour can be smushed together into a ball. Place the ball of dough into a resealable bag.
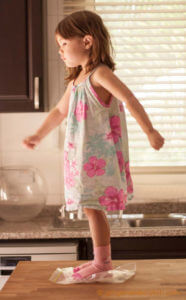
Seal the bag but leave a small opening at the corner so that the bag doesn't explode when walked on. - Knead dough with your feet. Wear socks to prevent the bag from sticking to your feet. I would also suggest placing the bag on a towel to prevent the bag from tearing if you have rough floors. Gently walk on the dough for 2-3 minutes using balls of feet, heels, and toes to squish the dough. Try to keep your kids from stomping too hard or jumping on the bag or it will tear or pop like a balloon (been there, done that). If the bag does tear, cut or scrape away any dough that might be dirty so you don't have to chuck the whole batch. Take the dough out of the bag, fold it in half and then in half again. Pat into a ball and knead with the feet again for 2-3 minutes. Fold and pat the dough into a ball again.
- Rest the dough for 30 minutes at room temperature. Put the dough back into the plastic bag and make sure all the air is squeezed out of the plastic bag and that it is completely sealed so the dough does not dry out.
- Knead dough by repeating step #4.
- Rest the dough for 3 hours at room temperature or overnight in the fridge. Resting allows the dough to fully hydrate and for the gluten in the dough to relax so that it will be easier to roll.Again, make sure all the air is squeezed out of the plastic bag and that it is completely sealed so the dough does not dry out.
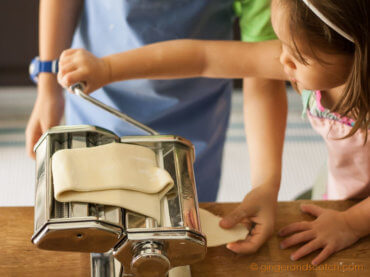
- Roll dough into a long rectangle and about 1/8" thick (3mm). Before taking the dough out of the bag, you can knead the dough one more time with your feet if the kids are keen to do so (my kids always are). Take the dough out of the bag. You will feel that it's much softer and smoother than when we first mixed it.Halve the dough and return one portion to the plastic bag. Sprinkle a little bit of a tapioca starch onto a clean work surface and on the dough. We recently bought this hand-crank pasta maker from Marcato Atlas and I refused to use it at first, preferring to roll my dough the old fashioned way. But the udon dough was rather difficult to roll by hand so I after a few attempts, I caved and took out the pasta machine. And all I can say is: “Holy moly guacamole!” I am in love with that machine. We made our first batch of udon noodles with just a rolling pin and knife so it is definitely doable but using the pasta machine for this tough dough made the experience so much more enjoyable.We started with level 0 on the machine which is the widest setting and fed the dough through the rollers about 4 times, folding it in thirds for the first 2 times. Then we moved on to Level 1 and fed the dough through the machine 3 times. Finally 3 times in level 2 which according to the user manual is 3.3 mm thick (about 1/8").
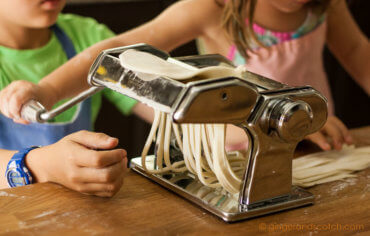
- Cut the dough into noodle strands. When the dough is flattened to the desired thinness, fold dough into thirds or quarters – whatever works for you depending on the length of your dough and knife. Cut the folded noodle dough to desired thickness. We prefer our noodles about 1/8" (3 mm). When cutting noodles, keep in mind that they will expand in size when cooked. We used the larger sized cutting rollers (fettuccine size) that came with our Atlas pasta machine and it was so fast and easy. However, fettuccine is flat and udon is almost always square-shaped so I think for our next batch I will cut the machine-rolled dough by hand. After the noodles are cut, sprinkle them with a little tapioca starch and shake them around to prevent the noodles from sticking.
- Cook noodles. Bring a large pot of water to boil and then add the noodles. Lower heat to simmer and swirl the noodles around with a heat-proof utensil. My udon noodles too about 15 minutes to get to the right consistency. The timing will vary depending on the thickness of your noodle so best to taste test every few minutes from the time you start simmering to determine the right cooking time. Drain noodles and rinse them in cold water to remove excess starch and prevent sticking.
- Serve immediately with soup or sauce. You can also store them in the fridge (covered) for a few days or freeze them.
Notes
- Do not defrost when ready to use or they will get gummy. Just toss frozen noodles directly in the sauce or soup or you can parboil first in a pot of boiling water for 1 minute.
- Udon dough uses more salt than pasta or bread dough because the salt is needed to strengthen and stretch the gluten in the flour. This produces the desired chewy texture in the cooked noodles. When the noodles are cooked in plain water, a lot of the salt is removed in the process.
• Marcato pasta machine
• Imperia pasta machine
• OXO digital scale
• OXO dough cutter and scraper